
If you’ve ever experienced temperature extremes throughout your home, or difficulty regulating the temperature, you may want to take a quick look at your insulation and see whether it meets the guidelines for your region. It can really pay off in the long-term and short-term!
STEP #1 – CHECK REGIONAL STANDARDS
We had some extreme temperature disparities in our home (it felt like we’d walked outdoors at times!) that did not appear to be caused by inadequate ventilation or the need for wall insulation, so we decided to dig further and investigate what was going on in our attic.
A quick google search led us to a chart with updated insulation standards for our region, showing what the thickness/depth of insulation should be depending on the material.

When we checked our attic insulation, we discovered that our attic insulation was TOTALLY missing in some areas and much too thin in others. The entire attic definitely did not meet our regional standards. We knew we needed to do something ASAP!
Proper insulation can make a HUGE difference not only on your comfort, but also on your monthly heating/cooling expenses.
STEP #2 – SEAL GAPS OR CRACKS
Purchase a insulating sealant from your local home improvement store (we used this one) and make a full check of the space you plan to insulate, sealing any visible cracks or gaps along the floor of your attic into your home. Make sure to read all directions and use proper protective clothing and gloves. This stuff is a bear to get off anything- including your hands!


Before sealing… 
After sealing hole with a foam spray
STEP #3 – GEAR & EQUIPMENT
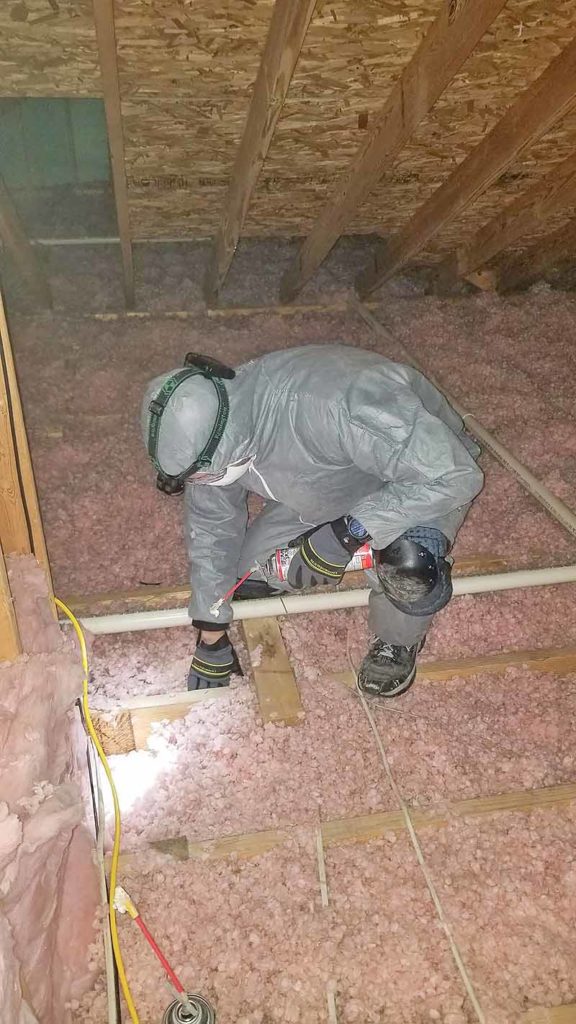
This was not a very difficult project to tackle after we got into a rhythm (it only took us an afternoon to complete), but it IS MESSY… as you can see from the pictures below!
Blown-in insulation goes EVERYWHERE, so you need to wear protective gear. Protecting your eyes, skin, and lungs is of paramount importance. Do not attempt to blow-in insulation without proper protective gear.


Protective gear is a MUST! 
The air gets filled with insulation dust as you work
Protective gear suggestions:
- Disposable protective suits that are made for insulation work
- Ventilated face masks
- Protective eye goggles (preferably seal around the eyes)
- Gloves
We also recommend using a headlamp if you have one, or make sure you have bright lighting in your attic to maintain visibility while working.

The benefit of ordering a large amount of blow-in insulation is that many companies deliver the pallet(s) of insulation to your home at no additional cost AND they have machines for blowing-in insulation available for free 24-hour use! We had the insulation delivered to our home and then, when we were ready to install, we drove to our local store to pick-up the machine.
We checked prices at Home Depot and Lowe’s in our area and found that they were fairly comparable, so just check their prices online and verify that your local store has machines available to do the install. Make sure that the amount of insulation you’ve ordered meets the minimum requirements for the use of their blowers.

STEP #4 – INSTALL
After you have sealed the attic space, protected yourself with proper safety gear, and read the instructions on your blower machine- it’s time for install!
Here’s just a few tips:
- Teamwork – it really helps to have at least 2 people for this project so that someone can be on the ground prepping, breaking up the insulation, and re-filling the blower’s hopper while the other person is blowing it in the attic.
- Measure your progress – we used a long stick with a line marked on it (pictured below) to check our progress towards the desired insulation depth for our region. The person blowing-in the insulation can keep this nearby to check if they’ve reached the desired depth and to know when to move on.


Mark a tall stick with the insulation level needed to monitor the levels as you blow-in the insulation 
- Create a work-flow station – as you get into a rhythm, you’ll find yourself having to move quickly to refill the blower’s hopper. It can be helpful to situate the blower next to a work surface for cutting open the bags and breaking the “bricks” into manageable chunks to crumble into the hopper. Make sure that your packs of insulation are nearby this area to easily pull from and keep the work flowing.

- Make sure to FULLY OPEN the valve to the hose. The insulation blower is a simple machine, with a basic hopper that grinds up the insulation chunks and then spits it out through a blower connected to a long hose, but there’s usually a little metal flap or tongue that can be used to shut-off hose access. These metal flaps, if not pulled all the way open, will slow the air flow and the blowing process will be extremely slow or even get clogged.


- Be careful of the grinder – it should go without saying, but the hopper has metal guards over the top for a reason! Be SMART, keep your arms/hands OUT of the hopper. Do not reach into the hopper at any point without first turning the machine OFF!

That’s it! Just a few simple steps to improve your home’s efficiency!
It has been over 1 year ago that we re-insulated our attic and- WOW- have we enjoyed being able to better regulate our home’s temperature! No more freezing rooms in the winter or sauna zones during the summer! 🙂

We hope that sharing our experience of re-insulating our attic helps or inspires you with your own projects. We’re just normal home-owners trying to be good stewards of our home- learning new things every day!
-The Stones
Curious too? Check out How to Customize Your Home with DIY Wainscotting or see The 5 Apps We Love to Declutter Paper!


Karla Renee Petersen
I live in a rental that is TERRIBLE at maintaining heat. Costs a bundle with the oil furnace! Recently, the landlord was here to check things out and has committed to attic insulation, several new windows, and a couple of new doors that are ill fitting. Yay! BUT, I sure am glad, after reading this, that I don’t have to be the one to do the insulation! Good on you.
Dave
Thanks Karla, it was a job, but WELL worth it!
Jon Olsen
It’s crucial to check regional insulation standards to ensure proper insulation depth and efficiency. Sealing gaps and cracks is an essential step to prevent air leakage. Your emphasis on wearing protective gear is spot-on as it ensures safety during the messy process. Additionally, your tips on teamwork, measuring progress, and creating a work-flow station are valuable for a smooth installation. Overall, your article provides practical guidance for homeowners looking to improve their home’s insulation and energy efficiency.
Dave
Thank you Jon, much appreciated!